In the first part of this blog article, Why You Should Build a Learning Organization? we talked about the importance of fostering a learning culture and building sustainable structures for learning in your organization. In this second part, we will focus on the tools in Microsoft 365 that you can use to create your own learning content to ensure your organization’s intellectual property is captured, shared and retained.
Different types of learning
With the enormous pace of information creation and product and service development, there is no way that your organization can produce all the learning content required to develop your employees. You need to rely on 3rd party content. There are numerous course providers that provide high-quality courses at cost-effective rates - Storyals being one of them!
Leverage 3rd party course providers for anything that is “generic”, i.e., that can be taught by a subject matter expert outside your organization – project management, communication skills, IT training and so on.
All the expertise and knowledge that is unique to your organization, that can’t be captured or purchased from external course providers, is your responsibility to develop and sustain. In this blog post, we will share practical tips for how you can take the unstructured knowledge and experience (that is all over the place) and structure it into a sustainable format as a “course” that can be shared throughout your organization, to ensure your intellectual property is captured and retained for the future. Encourage people in your organization to share their valuable expertise by sharing this blog post with them!
Key questions before creating a course
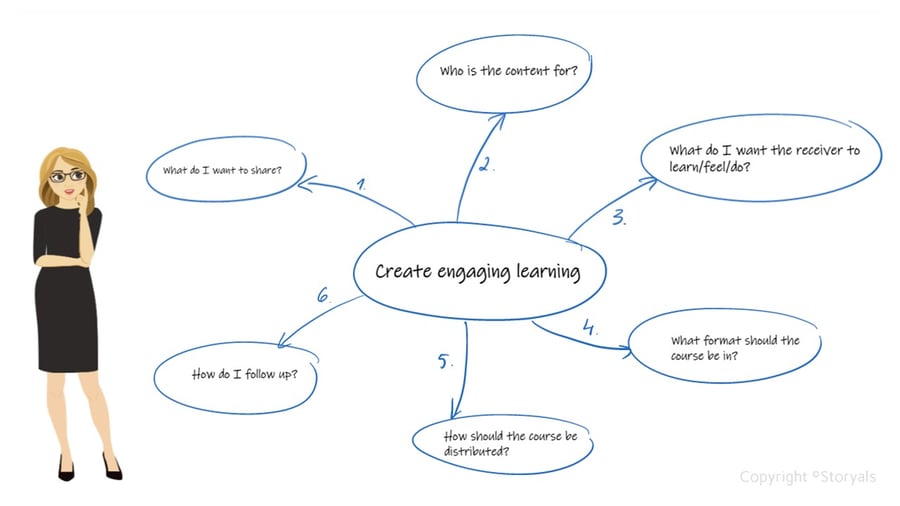
Before you dive in and start sharing your expertise in a course, answer these questions:
- What do I want to share?
- Who is the content for?
- What do I want the receiver to learn/feel/do?
- What format should the course be in?
- How should the course be distributed?
- How should it be followed up?

When it comes to following up, we warmly recommend using a learning management system (like LMS365) to enroll, communicate and follow up on courses. Otherwise, there is a big chance that your course won’t be found by others and that defeats the whole purpose.
Key apps for creating courses in Microsoft 365
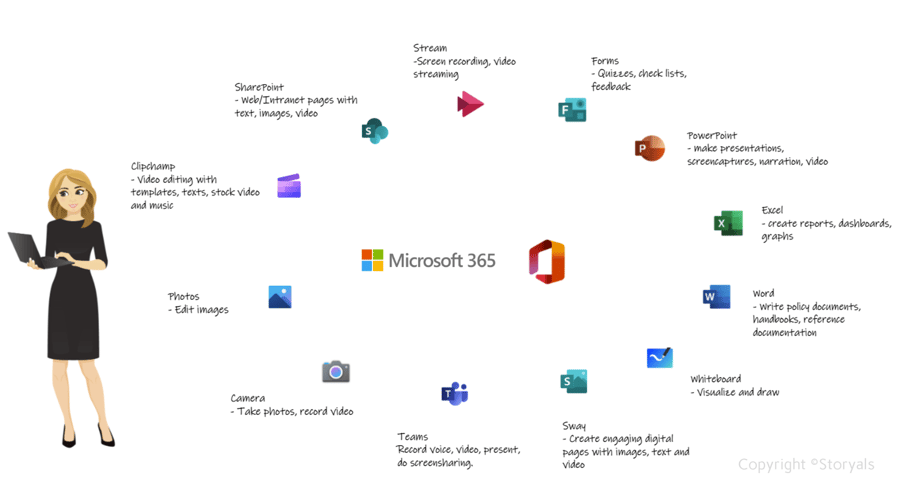
Once you have answered these questions, and you have a good outline for your course it’s time to put it all together! There is a wide range of different tools you can use to create your course included in your Microsoft 365 toolbox.

There is no single “course creation app,” because the format of the course depends on your content and the way you prefer to share your knowledge. Below we list some of our favorites!
Microsoft PowerPoint
For many, PowerPoint is the ideal application for creating beautiful presentations with images, text, and video. The perfect app for sharing your expertise! In addition to creating slides in PowerPoint, you can also use the app to record your presentation into a video along with a video of you as you present. You can also use PowerPoint to record screen captures if you want to make a video of you showing something on your screen. Using new additions like Cameo, you have more options to create nice effects with your camera feed integrated into your slides.
Microsoft Sway
Sway is not very well known, but an amazing app for storytelling. Using Sway, you can create “website-like” experiences combining text, images, and video. A Sway is shared via a link and renders nicely on mobiles, tablets, and computer screens. You can learn more about both Microsoft PowerPoint and Sway in the Storyals course Tell powerful stories.
Microsoft Teams
Microsoft Teams is a great application for creating learning content! Using Microsoft Teams, you can deliver your message (with or without other attendees) record the meeting and save it as a video. To start recording, go to the calendar and tap “Meet now” and then “Start meeting”. You don’t have to worry about inviting anyone else. Once you are ready to record, tap “More options” and then “Start recording”. Now you can share your screen, use PowerPoint Live to share your slides, play videos or visualize your message using Microsoft Whiteboard. The recorded meeting is saved as a video in your OneDrive account. If you want to edit the video file a bit you can do so using for instance Microsoft Clipchamp. You can learn more about using the various tools in Microsoft Teams in the Storyals course Lead engaging meetings online.
Microsoft Stream
Up until recently, Microsoft Stream was mainly used to share and stream videos within your organization, but now you can also use Microsoft Stream to record videos! Open Stream and click “New recording”. Select if you want to include your camera feed and select microphone. Finally, pick the window you want to record and deliver your message. When you are done, the video is saved to OneDrive.
Microsoft Clipchamp
This application is the new kid on the block! It’s a stand-alone app that you, (initially) need to use with a personal Microsoft account. It’s really easy to use and you can cut out parts you don’t want, add music, text and other cool effects. Get more info and start using the editor through this link.
Get the desired impact
Once you have put together the various assets into a course it’s important that it is discoverable and communicated to the relevant parties. Here it is extremely important that the course is added to a learning platform, or so-called Learning Management System.
If you would like to see how you can use LMS365 to share a course within your organization, we have created a training video for you that you can access free of charge! Get the course Create Engaging Learning Content Using LMS365 through the link below.

